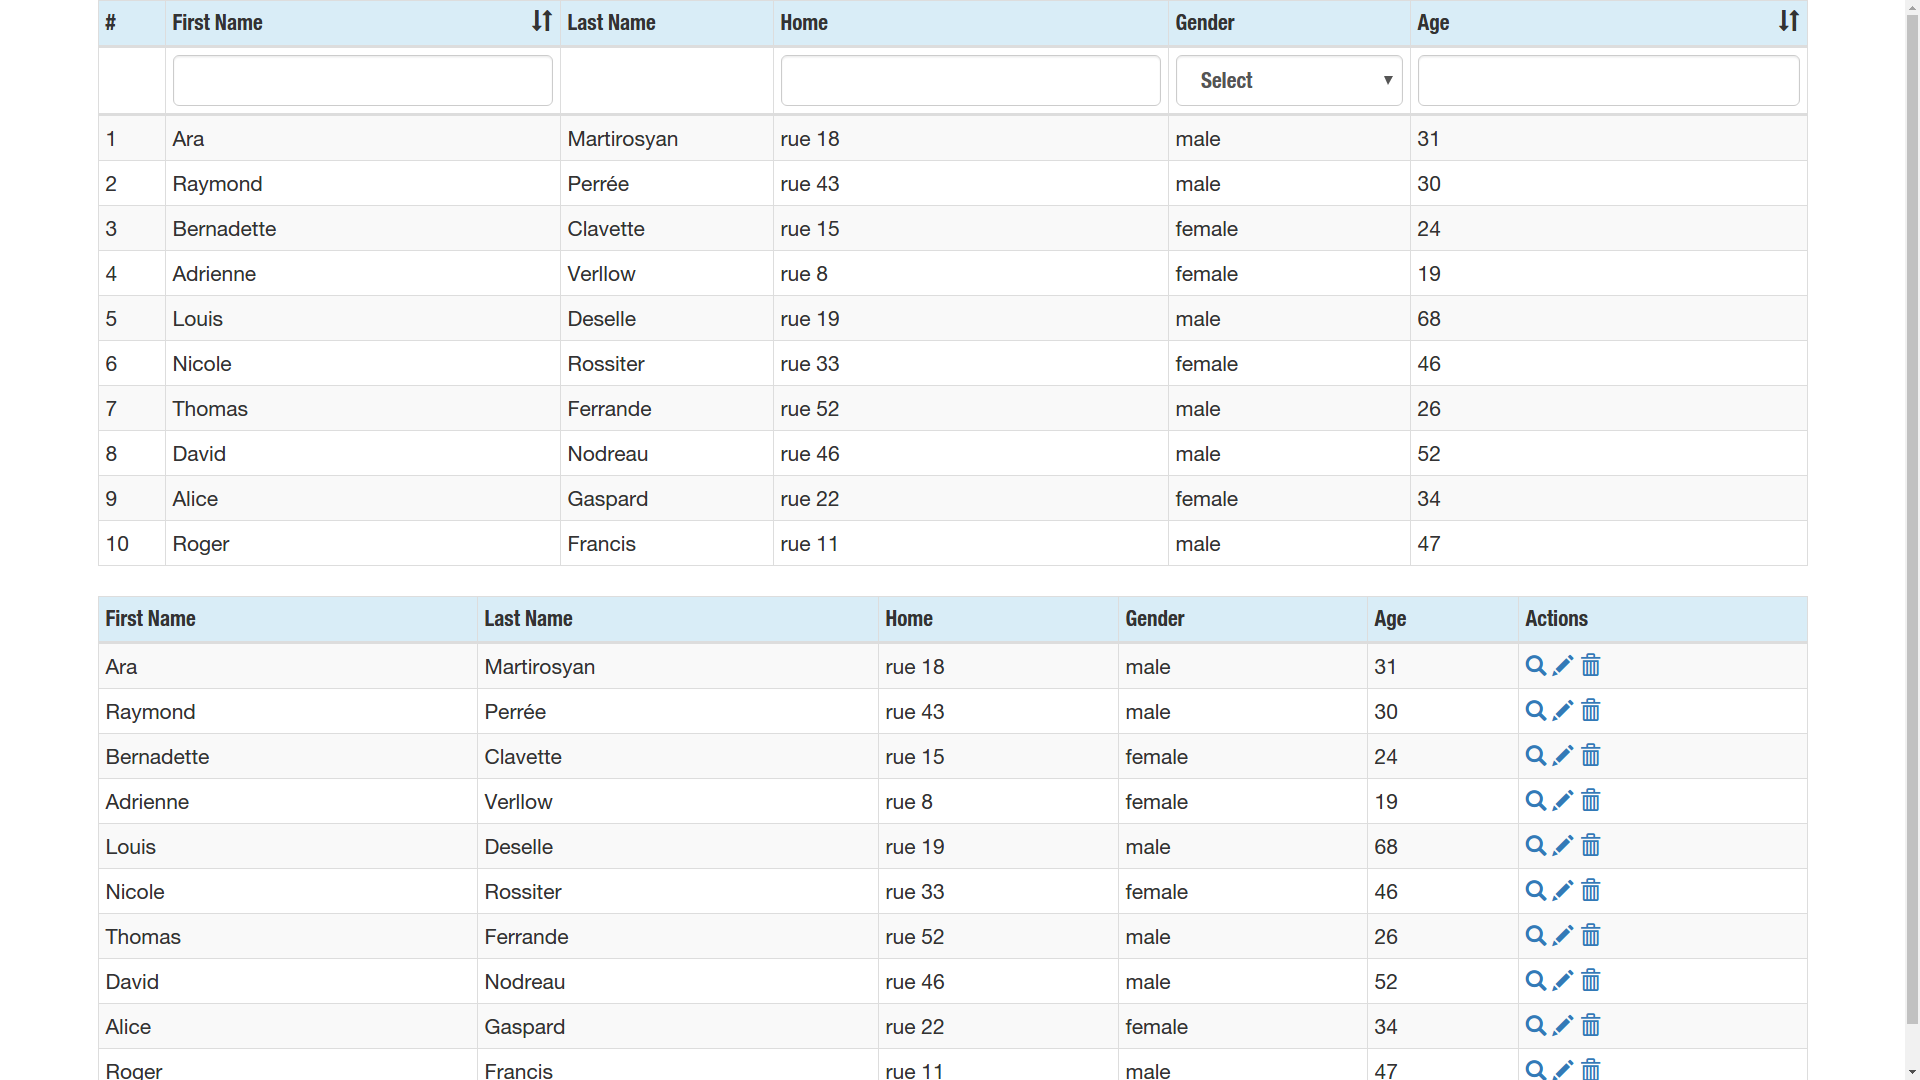
This is a new Java API for building database table view UI for entity data objects accessed from an underlying database.
Let's say we have an entity class to represent a user. The user entities will be persisted into a corresponding User table in a database. Persistence-related actions like inserting, getting, updating or deleting of our users could be realized by the methods of user DAOs (Data Access Objects). For the completeness of the description we could also have a service layer that takes the queried data from DAOs, adds some extra logic on top and passes to the controllers. In the service layer we can for example implement our API to build the table view markup string for the accessed data array and pass to the controller. An example of a small code, that generates the simplest table markup string for an array of user entity objects, would look like
new TableView(users, new String[][] {
    {"First Name", "firstName"},
    {"Last Name", "lastName"},
    {"Age", "age"}
}).post();
and the corresponding table markup would look like
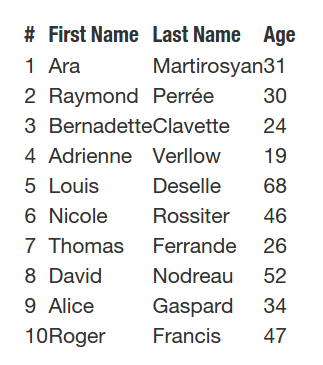
The first argument of the TableView constructor can be an array of any entity object. Here, in the example above we have an array of type User[10]. The second argument is an array of string arrays in which each string array stands for a specific column configuration. In the column configuration arrays the first entry string element is always the top label of the column. The second entry string is the get method defined in the User class for a specific property. It is possible that the property itself does not exist. It just looks for a method prefixed with "get". Like in case of the "firstName" it will look for the getFirstName() method.
It is the post method of the TableView class that generates all the necessary markup, but we can use more methods to add more styling or functionality. Say if we want to add borders we simply use a new method that allows to add attributes to the <table> tag
new TableView(users, new String[][] {
    {"First Name", "firstName"},
    {"Last Name", "lastName"},
    {"Age", "age"}
}).addTableTagAttr("border=\"1\"").post();
that results in

But our API is more powerful than this. We can add filterable and sortable functionality to our tables by adding the "sortable" id to our <table> tag and add some more keywords to our column configuration arrays. The filterable or sortable options can be added with respect to any column by simply using the "filterable" or "sortable" array entry string elements. The order in which they appear in the configuration array is totally irrelevant. The filterable or sortable options can be added together or separately independently from each other. Let's make our user table both filterable and sortable with respect to first name and last name columns and only filterable with respect to the age column.
new TableView(users, new String[][] {
    {"First Name", "firstName", "filterable", "sortable"},
    {"Last Name", "lastName", "sortable", "filterable"},
    {"Age", "age", "filterable"}
}).addTableTagAttr("id=\"sortable\" border=\"1\"").post();
I deliberately switched the orders of the "filterable" and "sortable" entries in the first and second column configuration arrays. This results in

In the example above we sorted in ascending order with respect to "Last Name" column and filtered to find those users who are in their 30s or just have number 3 in their age. The gender of the user can be specified for example by "male" of "female" and for the gender column the most natural thing to use for filtering would be a drop-down selection list rather than an input form. So instead of "filterable" we can use "filterable(male,female)" with select options.
new TableView(users, new String[][] {
    {"First Name", "firstName", "filterable", "sortable"},
    {"Last Name", "lastName", "sortable", "filterable"},
    {"Gender", "genderLable", "filterable(male,female)"},
    {"Age", "age", "filterable"}
}).addTableTagAttr("id=\"sortable\" border=\"1\"").post();
This assumes that there is a getGenderLable() method defined in User entity class and in case the gender property takes only boolean variables, we can define it the following way
public String getGenderLable() {
  if (getGender() == false) {
    return "female";
  } else {
    return "male";
  }
}
that results in

For sorting the data in the columns the tables implement Bootstrap's "glyphicon-sort" icons, so why not to use Bootstrap to style the rest of our tables?
new TableView(users, new String[][] {
    {"First Name", "firstName", "filterable", "sortable"},
    {"Last Name", "lastName", "sortable", "filterable"},
    {"Gender", "genderLable", "filterable(male,female)"},
    {"Age", "age", "filterable"}
}).addTableTagAttr("id=\"sortable\" class=\"table table-bordered\"").post();
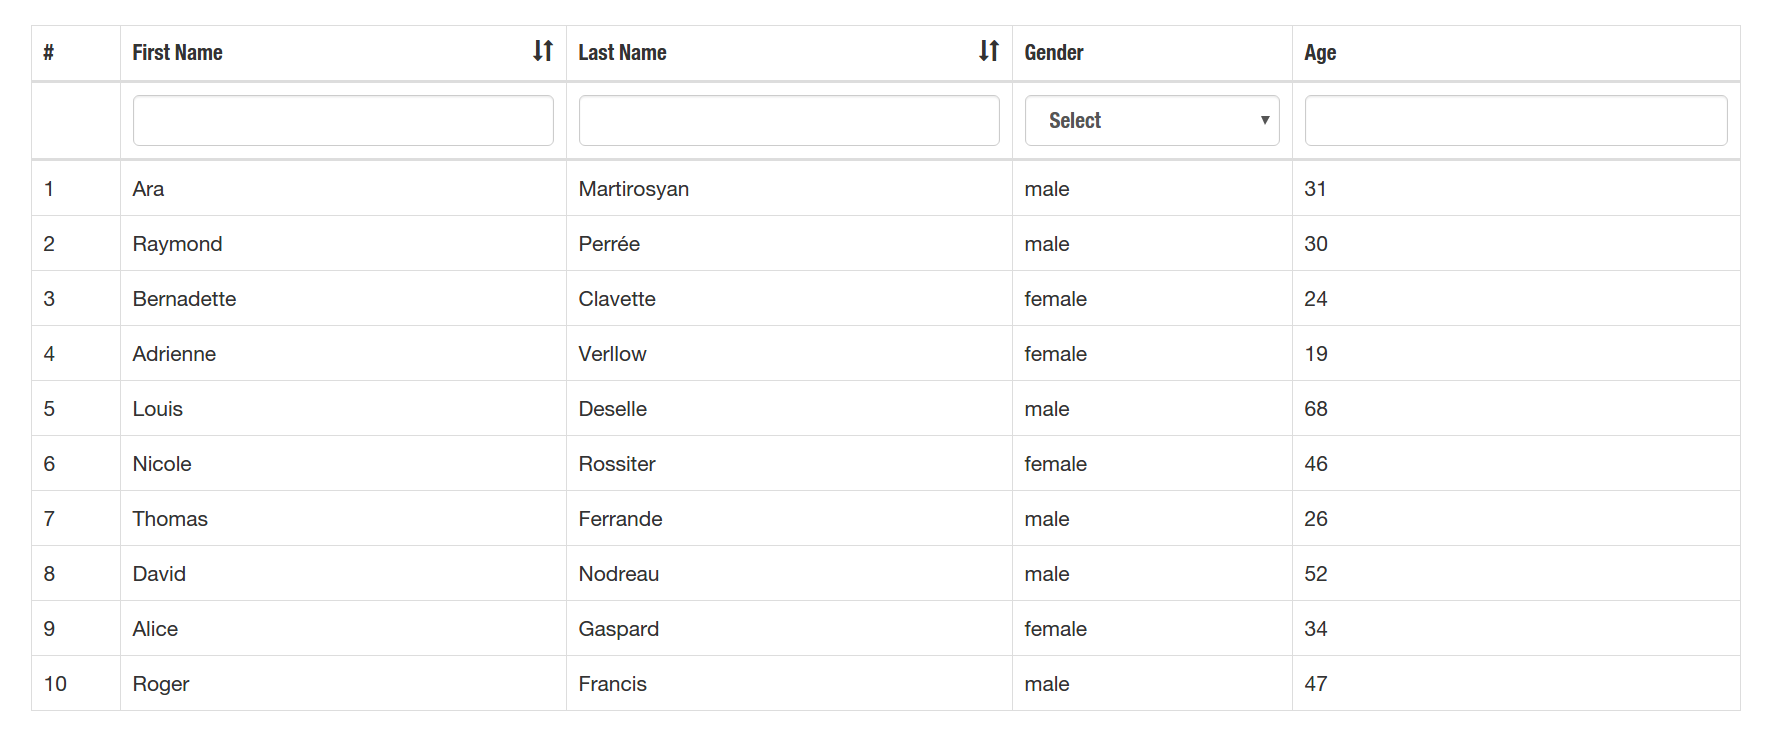
Let's make the rows striped and also style the header a bit. To style the header we have to use the addTableHeaderTrAttr method of the TableView class
new TableView(users, new String[][] {
    {"First Name", "firstName", "filterable", "sortable"},
    {"Last Name", "lastName", "sortable", "filterable"},
    {"Gender", "genderLable", "filterable(male,female)"},
    {"Age", "age", "filterable"}
}).addTableTagAttr("id=\"sortable\" class=\"table table-bordered table-striped\"").
   addTableHeaderTrAttr("style=\"color:white;background-color:#800000\"").
   post();
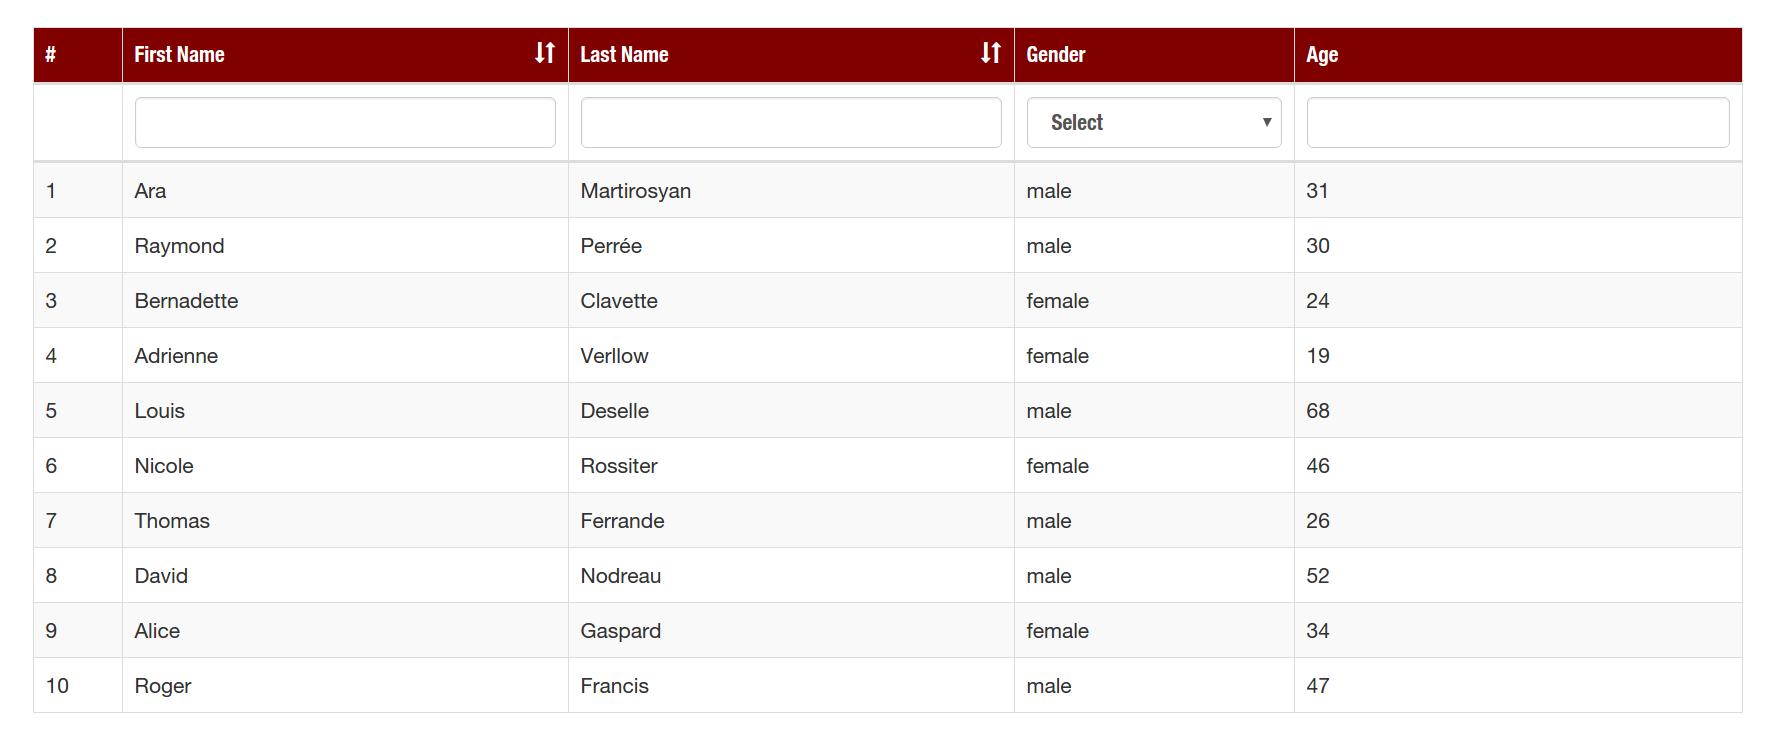
By default the numeration of the rows are turned on, but we can easily remove the numeration column by implementing the setNumeration method that takes only boolean arguments.
new TableView(users, new String[][] {
    {"First Name", "firstName", "filterable", "sortable"},
    {"Last Name", "lastName", "sortable", "filterable"},
    {"Gender", "genderLable", "filterable(male,female)"},
    {"Age", "age", "filterable"}
}).addTableTagAttr("id=\"sortable\" class=\"table table-bordered table-striped\"").
   addTableHeaderTrAttr("style=\"color:white;background-color:#800000\"").
   setNumeration(false).
   post();
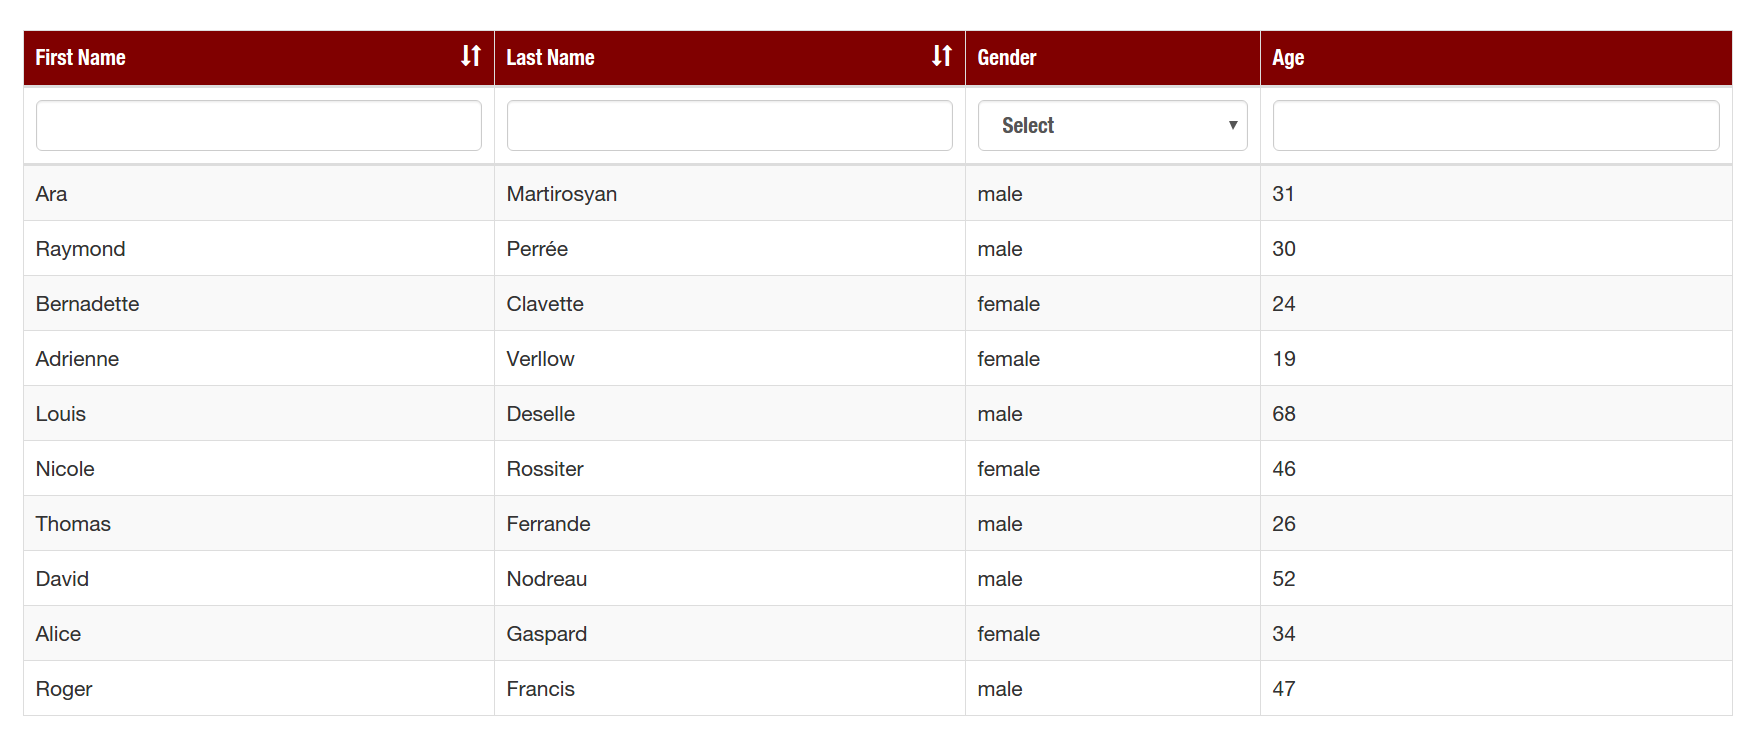
It would be very natural if somebody becomes eager for an "Action" column, from where the user can interact with the underlying database, update or delete a user. Creating a new column implies a new "get" function in the entity class. Let's just give an example of a getAction function. We will assume that we have already made the persistence-related functions in the DAO and Controller classes. Say we can make a detailed view of the user by making a GET request to /users/id. We assume that we are able to get the update form by making a GET request to /users/update/id address and apply the updates made in the update form by making a POST request to the same /users/update/id address. And finally we also assume that we can delete a user by making a POST request to /users/delete/id. Here in all the urls the id implies the user id in the user table of the underlying database. Although in all the above given examples the "get" functions do not take any arguments, it is possible to define and implement as many arguments as we need. Here, our getAction in the entity class will take four arguments.
public String getActions(String base, String isView, String isEdit, String isDel){

  String view, edit, del;

  String id = "" + getId();

  view = "<a href=\"" + base + "/users/" + id + "\">" +
         "<span class = \"glyphicon glyphicon-search\"></span>" +
         "</a>";
  edit = "<a href=\"" + base + "/users/update/" + id + "\">" +
         "<span class = \"glyphicon glyphicon-pencil\"></span>" +
         "</a>";
  del = "<a id=\"" + id + "\" href=\"" + base + "/users/delete/" + id + "\">" +
        "<span class = \"glyphicon glyphicon-trash\"></span>" +
        "</a>";

  String result = "";

  if (isView.equals("true")) {
    result +=  view;
  }
  if (isEdit.equals("true")) {
    result +=  " " + edit;
  }
  if (isDel.equals("true")) {
    result += " " + del;
  }

  return result;
}
The base is the context path (say http://www.aralmighty.com). The configuration array for the "Actions" column must be added to our TableView constructor in the following form
new TableView(users, new String[][] {
    {"ID", "id"},
    {"First Name", "firstName", "filterable", "sortable"},
    {"Last Name", "lastName", "sortable", "filterable"},
    {"Gender", "genderLable", "filterable(male,female)"},
    {"Age", "age", "filterable"},
    {"Actions", "actions(http://www.aralmighty.com,true,true,true)"}
}).addTableTagAttr("id=\"sortable\" class=\"table table-bordered table-striped\"").
   addTableHeaderTrAttr("style=\"color:white;background-color:#800000\"").
   setNumeration(false).
   post();
Now we have the actions column with three view, update, delete actions represented by Bootstrap's glyphicon-search, -pencil and -trash icons. The click on "tbody>tr>td>a>span.glyphicon-trash" css selector will trigger a modal window for the delete confirmation.
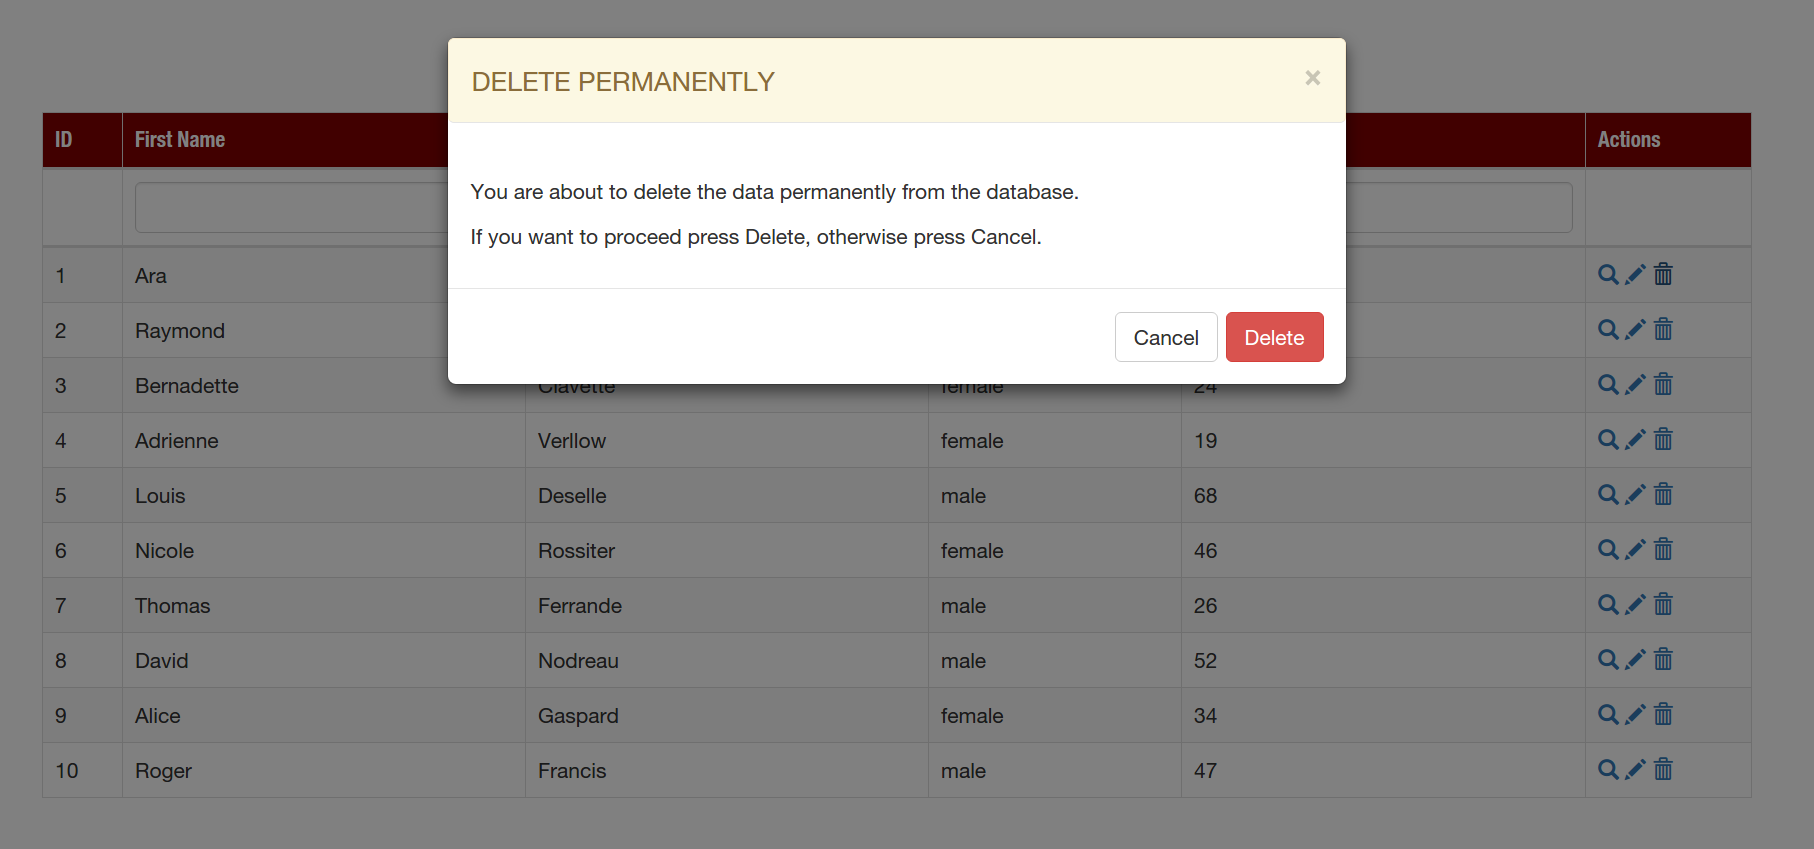
Once we confirm the Delete an ajax POST request will be triggered to the address specified for the href attribute inside the <a> link-tag of glyphicon-trash icon.
So far, we have only been talking about the TableView class that is able to generate a table view for an array of entity class objects, but what if we want to click on glyphicon-search that leads to /users/id and have a table view of a user with that particular id. There is a similar class called TableObjectView that in its constructor takes a single object argument instead of an array of objects. So to have a detailed table view of user[0] we can write
  new TableObjectView(users[0], new String[][] {
      {"ID", "id"},
      {"First Name", "firstName"},
      {"Last Name", "lastName"},
      {"Address", "address"},
      {"Gender", "genderLable"},
      {"Age", "age"}
  }).addTableTagAttr("class=\"table table-bordered table-striped\"").
      addTableHeaderTrAttr("class=\"info\"").
      post();
Ta da! That seems to be me

INSTALLATION
Easy! Open up your terminal and run
$ cd ~/Desktop
$ git clone https://github.com/ara-martirossyan/Filter-Sort-Table.git
you can easily build and deploy the project that appeared on the Desktop by the script I wrote here. So we open the project directory in terminal and run the deploy script.
$ cd ~/Desktop/Filter-Sort-Table
$ deploy tables /home/ara/java/apache-tomcat-9.0.0.M9
Of course you have to use your own tomcat directory path. You cant try all the table examples above within Filter-Sort-Table/WebContent/index.jsp file.

